はじめに
首をまわして距離の近い方を向かせます。
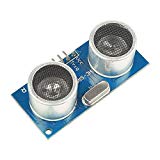
今回は首のサーボモーターを回しながら超音波センサーを使って距離を測り、一番距離が短くなった方を向かせます。
HW編の おわりに にあるソースコードに順次機能を追加して行きます。
SW編はHWの終わりにで調整できているものとします。
Arduinoのスケッチは大きく分けると、定義、初期設定、メインループ の三つから構成されています。
HWの最後のソースコードの定義、初期設定、メインループにそれぞれソースコードを追加すると機能が追加されます。
//定義
// UltraSonic
const int pingPin = 16;
#define microsecondsToCentimeters(a) (a/29/2)
#define microsecondsToMirimeters(a) (a*10/29/2)
//初期設定
// UltraSonic
// なし
//メインループ
void loop() {
// UltarSonic
if ( command == 'U' || command =='u' ) // 'U' is UltraSonic mesre distance Command "U"
{
Serial.print(command);
Serial.print('\t');
long mm[3];
for(int i=0; i<3; i++)
{
long duration;
mm[i]=9999;
// The PING))) is triggered by a HIGH pulse of 2 or more microseconds.
// Give a short LOW pulse beforehand to ensure a clean HIGH pulse:
pinMode(pingPin, OUTPUT);
digitalWrite(pingPin, LOW);
delayMicroseconds(2);
digitalWrite(pingPin, HIGH);
delayMicroseconds(10);
digitalWrite(pingPin, LOW);
// The same pin is used to read the signal from the PING))): a HIGH
// pulse whose duration is the time (in microseconds) from the sending
// of the ping to the reception of its echo off of an object.
pinMode(pingPin, INPUT);
duration = pulseIn(pingPin, HIGH, 20000); //timeout 20msec
if(duration > 0)
{
// convert the time into a distance
mm[i] =microsecondsToMirimeters(duration);
}
delay(20);
}
mm[0]=MID(mm[0], mm[1], mm[2]); // 中央値
Serial.print(mm[0]);
Serial.print('\n');
} // UltarSonic
// Ultrasonic Radar
if ( command == 'R' || command == 'r' ) // 'R'is ultrasonic Radar Command "R"
{
Serial.print(command);
Serial.print('\n');
// Ultla Sonic Sornner
servo[7].attach(7+2);
int minDistanseAngle = 90; // deg
long minDistanse = 9999; // mm
for(int i = 30; i <= 150; i+=3) // goes from 0 degrees to 180 degrees
{ // in steps of 1 degree
servo[7].write(i); // tell servo to go to position in variable 'pos'
delay(10); // waits 15ms for the servo to reach the position
long duration, cm;
long mm[3];
for (int j = 0; j < 3; j++)
{
long duration;
mm[j] = 9999;
// The PING))) is triggered by a HIGH pulse of 2 or more microseconds.
// Give a short LOW pulse beforehand to ensure a clean HIGH pulse:
pinMode(pingPin, OUTPUT);
digitalWrite(pingPin, LOW);
delayMicroseconds(2);
digitalWrite(pingPin, HIGH);
// delayMicroseconds(5);
delayMicroseconds(10);
digitalWrite(pingPin, LOW);
// The same pin is used to read the signal from the PING))): a HIGH
// pulse whose duration is the time (in microseconds) from the sending
// of the ping to the reception of its echo off of an object.
pinMode(pingPin, INPUT);
duration = pulseIn(pingPin, HIGH, 20000); //timeout 20msec
if (duration > 0)
{
// convert the time into a distance
mm[j] = microsecondsToMirimeters(duration);
}
delay(20);
}
mm[0] = MID(mm[0], mm[1], mm[2]); // 中央値
Serial.print(mm[0]);
Serial.print(",");
if (minDistanse > mm[0])
{
minDistanse = mm[0];
minDistanseAngle = i;
}
}
servo[7].write(minDistanseAngle); // tell servo to go to position in variable 'pos'
delay(25); // waits 15ms for the servo to reach the position
servo[7].detach();
Serial.println();
} // Ultrasonic Radar
}
解説
超音波センサーに向かって出力用の信号を作って出力します。
次に入力用に切り替えて pulseIn() 関数で、ハイの期間を計測します。
誤計測対策として三回計測して中央値を採用しています。(中央値フィルタ、メディアンフィルタと呼ばれます。)
コマンドの違いはその場所で計測するか、首を動かしながら計測するかの違いです。
使い方
超音波センサーはUコマンドとRコマンドです。
Uコマンドは距離を測ってシリアルモニタに出力します。
Rコマンドは首のサーボモーターを回しながら一番近い場所にロボットの顔を向けます。
おわりに
超音波センサーを使って、距離や位置を計る装置はソナーと言います。簡単なソナーが出来ました。
Sコマンドは先に使っていたので’R' レーダー コマンドにしました。
超音波を使って距離画像を得ることもできます(このセンサでは無理ですが)、これはまたの機会に。
購入品情報
このセンサからインスパイアされてロボットの頭部を設計しました。

